Reference Manual
Chapter 7: Lighting Rods Conversion
Article by: Spencer Meehan
Reference Manual
Article by: Spencer Meehan
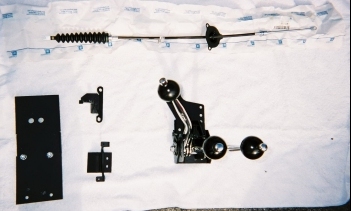
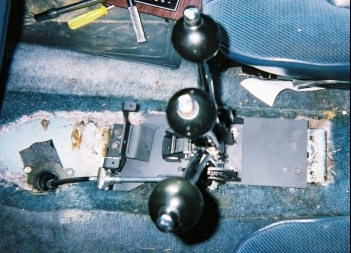
Here is all the components needed to do the conversion from a factory style floor shifter to a Hurst Lightning Rod setup (minus one of Angelo's excellent top plates).
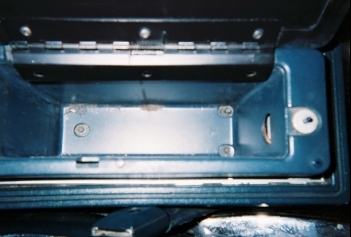
First open the console lid and you will see three screw heads after you empty your consoles contents of all the junk in it. Remove these with a 7mm socket.
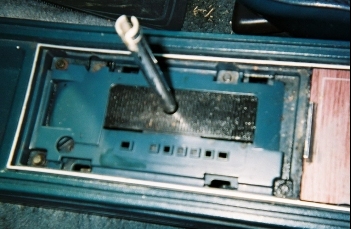
You need to take the clip out that holds the shifer handle on. This is easily accomplished with a screwdriver. The top plate will simply pull up and off because it is held in with clips. There are four screws underneath it that you will need to remove. After you have these screws out, take your console up and out, unplugging the harness for the console lights as you remove it.
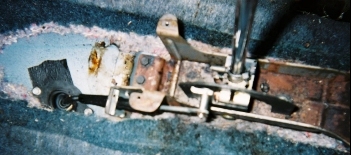
Take the clip out that holds the shifter cable to the shifter. It just slides out with a screwdriver. Take the cotter key out of the shifter on the end of the shifter cable and slide the cable off. Remove the four bolts that hold the shifter down to the floor (the back two didn't make it into the picture) and remove the shifter. Take the screws out of the boot for the cable.
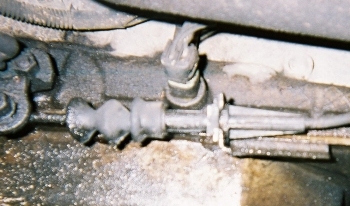
Crawl under the car and remove the cotter key from the transmission linkage and slide the end of the cable off the shaft. Remove the clip that holds the shifter cable in place. Take off the cable mounting bracket.

Replace the old mounting bracket with the new one. Crawl on top and remove the old cable. Snake the new one down. Crawl under the car and place the cable in the bracket and replace the clip. Loosen the shaft the end of the cable goes onto. Turn the selector to the neutral position (Two clicks) and put the cable on it. Replace the cotter key.
Get back in the car and bolt the plate down to the floor at the back using the original bolts. Bolt the new shifter to the plate over the studs being sure to snake the cable through the hole as you set it down. Bolt the last bracket down using the original hardware here too. Place the clip that holds the shiter cable in place into the slot it goes in, make sure the cable is seated in the hole it goes in. With the shifter in neutral, put the cable on the shifter stud and put the cotter key in. Screw the cable boot down to the floor. I only used the top hole, but you can drill new holes if you like so you can use all three. Remove the passenger side seat. Take the knobs off of the shifter by first unscrewing the shifter buttons.
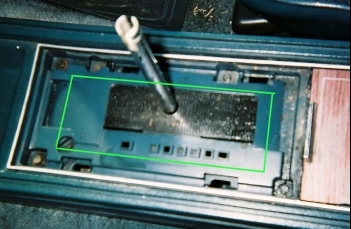
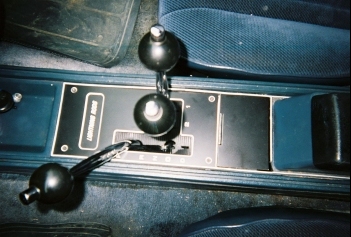
Cut out the area indicated by the green box. You must place the console over the shifter sideways then turn it so that it is straight. Once you have it in, replace the screws inside the console compartment. At the front, drill holes in the console that line up with the front shifter mounting braket and screw it down. Place the top plate on it. Mark and drill the bottom right hole. Again using the top plate as a template, cut out a piece of aluminum flashing using a utility knife. Cut it to the exact dimensions of the top plate. Install it around the shifter. Next put the boot on followed by the top plate. Screw the top plate down, and install the ashtray door cover. Screw the knobs and buttons back on the shifters. You may now reinstall the passenger side seat.
Get back under the car (you didn't think you were done, did you?). Tighten the stud on the transmission linkage. You may now check for proper operation of the shifers and if everything is alright, drive the car. Enjoy! Thanks to Matt and Angelo for all the help with this project.
| Table of Contents | Top of Chapter | |
|
|
||
| Copyright © 1998-2024 by The Members of The Oldsmobile Mailing List. All Rights Reserved. This web site is not affiliated with General Motors or Oldsmobile. General Motors and Oldsmobile are trademarks of their respective companies. The owners and members of this site are not responsible for errors or inaccuracies. | ||